Saturday, October 15, 2011

Home Interiors - Some photographs of my latest project @ Elita Promennade

Hi,

Before I get into the visuals...I have been getting questions on design best practices, materials to be used for interiors etc. from a number of you. This blog already has posts written earlier that answer some of these questions. As a refresher the links are given below. One more thing ... the blog archive (Look in the left pane of this page) has more than just what is mentioned below...feel free to browse through the same as well.

1. Choosing the right material for Woodworkhttp://www.homedesignbangalore.com/2010/09/so-what-is-right-material-to-choose-for.html

2. Thumb-rules for Costing & Budgeting for Interiorshttp://www.homedesignbangalore.com/2010/08/costing-your-woodwork-do-it-yourself.html

3. Design best practices for making Sliding Wardrobeshttp://www.homedesignbangalore.com/2010/07/sliding-wardrobes-do-it-right-first.html

4. Design best practices for building a modular kitchenhttp://www.homedesignbangalore.com/2010/06/so-what-is-modular-kitchen-and-some.html

....and finally - here are the photographs...would welcome any bouquets & brickbats :)

Thanks

NM

Elita Promenade - Book Rack & Show Case.
The pebbles in the bottom part of the unit are still to be put in

Elita Promenade - Entry Wall
I hand painted a part of this personally :)

Elita Promenade - Another view of the bookshelf.
Now you can see where the pebbles will go in

Elita Promenade - Sliding Wardrobe
Laminate & Glass Shutters & Metallic Edge Handles

Elita Promenade - Kids Study Area

Elita Promenade - Wall paper in Kids Room. Bed Headboard in Leather

Elita Promenade - Dressing Table

Elita Promenade - Master Bedroom Sliding Wardrobe
Laminate & Metallic Edge Handles

Elita Promenade - Guest BR Wardrobe
In Veneer & Melamine Matt

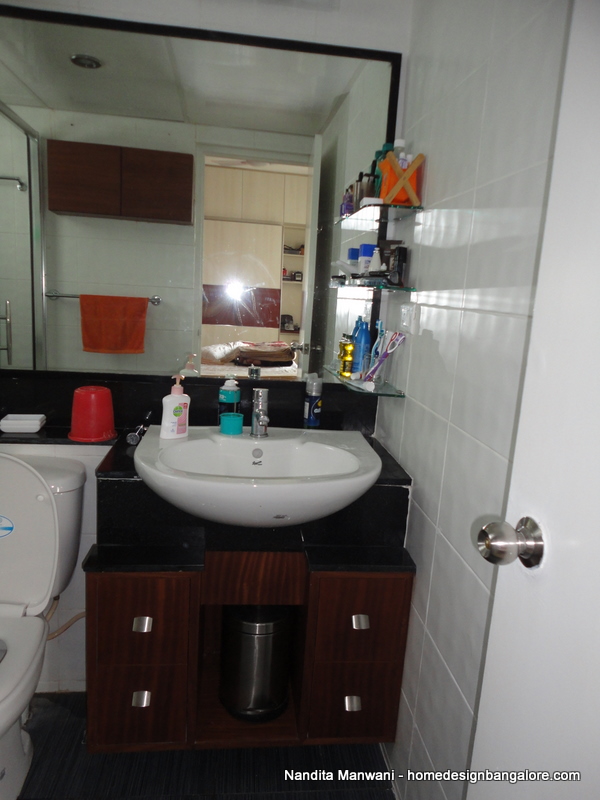
Elita Promenade - Bathroom Storage

Elita Promenade - Dining Table, Bar Unit & Wall Pannel (in Duco)

Elita Promenade - Kitchen Counter top is Quartz

Elita Promenade - Breakfast Counter Cum Storage. Acrylic (Hanex) Counter Top

Elita Promenade - Kitchen - Another Angle

Elita Promenade - One More Kitchen
the LED lights are visible in this photograph

Elita Promenade - Storage under the Breakfast Counter

Elita Promenade - Full Modular Kitchen

Elita Promenade - Dining Table, Bar Unit, Wall Paneling, Book Rack

Elita Promenade - Unit hosting the 4.5 feet Krishna Statue.
The whole living room was designed around this unit

Elita Promenade - Another image of the Krishna unit (in Duco) - with the lights off


Saturday, August 6, 2011

Home Design Vaastu Shastra - Episode 2 - Best practices in Kitchen design

Well....am back after a looooong break. Have been neck deep in work as well as daily household stuff these past few months.

One of the most tricky spaces at home in terms of design is the kitchen as it needs to be ergonomic, utilitarian, maximizing storage space as well as good looking all at the same time. The fact that the kitchen has "hot spaces", "wet spaces", "work spaces", "wash spaces"...(I guess you get the idea) complicates the design even further.

I am giving below some practical best practices in kitchen design that I have learnt in the course of the last few years I have been in the field, I hope you find these useful

1. Use the right wood & material for the kitchen. For more details refer my earlier post at http://www.homedesignbangalore.com/2010/09/so-what-is-right-material-to-choose-for.html

2. Ask your builder to give you a raw kitchen - with no tiling or the slab fitted  - In most cases the slab & tiles need to be changed or re-laid which ends up adding to the overall cost. Ask the builder to just hand over the tiles & the slab to you.

3. If possible ask your builder to provide tap points in the wall " Below" the slab height. This way you will be able to pull the pipe from behind the bottom cabinets and do the sink placement according to your need & design rather than be restricted by where the builder has provided the points.

4. Place the gas cylinders in the utility and have a piped connection to the hob. This is not only safer but also gives you vital storage space inside the kitchen since the cylinders move out.

5. Always provide a loft in the kitchen....this not only provides storage space but also hides the chimney exhaust pipe.

6. When deciding on the placement of the refrigerator keep in mind whether your refrigerator is right or left handed as this affects the "ease of access" while reaching inside the fridge.

7. The above applies to placement of the Microwave as well.

8. Drawers are ideal for storing stuff for daily use as stuff in drawers is easily accessible while cabinets (palla) are ideal for storing items that are sparingly used.

9. Use corners wisely. Corners provide fairly large spaces and can be well utilized for items of long term storage like grains, spare crockery, plastics etc.

10. If you prepare non veg at home then suction capacity of the chimney should be minimum 1000 cum/hr

11. Put the water purifier alongside the "second" sink in the utility. This reduces the "wetness" of the kitchen as it moves the "extreme wet work" to the utility.

12. Preferably leave work space on either side of the hob. Avoid putting the hob next to a corner or alongside the edge of the slab.

13. Keep spaces for refrigerator/ microwave/ dishwasher etc based on exact measurements. With space too small - things will not fit & spaces too large don't look good.

14. Never use Stainless Steel wire type cutlery unit. The cutlery keeps "peeping" out of these, obstructing the movement of the drawer

15. Plan for a hidden electric point to power the chimney as well as the hob (you may or may not know this but ignition systems of most hobs available in India are electrically powered - not battery powered)

Thats all that I can think of at the moment...will welcome any bouquets or brickbats.

Happy Home making

Signing off

Nandita


Tuesday, February 15, 2011

More Photographs - Latest project at Elita - JP Nagar


Elita Promenade - Guest BR 
Elita Promenade - TV Unit ...awaiting the TV :)

Elita Promenade - Study Unit

Elita Promenade - MBR - Sliding Wardrobe
(Read the earlier post on how to make one)

Elita Promenade - Self Explanatory

Elita Promenade - Kitchen 1/3

Elita Promenade - Kitchen 2/3 - Magic Corner

Elita Promenade - Kitchen 3/3 - Full
Tall unit on the left, space in the Right side unit is for the dishwasher

Saturday, January 22, 2011

Home Interior Vaastu Shastra - Episode One - Master Bedroom

On looking back at my posts I realized that while I have delved upon the design, engineering & cost aspects of home design, what is missing is something around aesthetics - things like colours, lighting, spaces etc. - a very important ingredient in converting your house into a "home"

In the next few posts I will try to cover a kind of a checklist of comon sense things to take into consideration while designing your home from the perspective of pure aesthetics. This is definitely not a "must do" kind of an input as individual tastes & situations will vary, however these checklists will help provide a broad guideline while designing your own home.

I am going to break this into 4 parts (Episodes) -  each around Master Bedroom, Childrens Room, Living Room & Kitchen. The first one below is on designing the Master Bedroom

A small disclaimer before I start - I am no expert at Vaastu and will not even attempt to sound intelligent on the august subject, what follows below is just Home Design Common Sense.

1. Head of the bed should not be under the Window - you don't get head rest space that is used for both comfort & decor (e.g. highlighting the wall around the head rest or putting a large family photograph there) + the cold breeze on your head in winter is ingredient for illness.

2. Align the length of the bed to the longer edge of the room - this gives better space utilization

3. Align the wardrobe (especially if long) to the longer edge of the bedroom.

4. In small size rooms go in for a sliding wardrobe

5. Bed should not be placed in front of the door (entrance). Leads to lack of privacy as well as blocks the view as when you see inside the room from outside...makes it look cluttered

6. For the same reason as above don't make the wall facing the entrance very heavy - in terms of both colour or woodwork.

7. Don't have heavy woodwork on both sides of the bed - makes the room claustrophobic

8. Don't extend the loft above the bedroom entrance - makes the room look boxy when seen from outside

9 For small rooms look at the possibility of reducing the depth of the Wardrobes. Use parallel coat hangers - along the face of the wardrobe (coat breadth is usually the constraint when designing wardrobes).

10. Use soothing colours in the bedroom. You can however highlight the wall that has the headrest with a brighter colour or textures.

11. Preferably use yellow lighting in the bedroom.

Thats all I can think of right now. Look forward to Episode 2 on Kitchens in the next post.

Signing off

NM


Saturday, December 18, 2010

Friday, September 17, 2010

So what is the Right material to choose for Woodwork?

So you have made your first visit to the market to decide on your interiors, visited @Home, HomeStop, Hometown, Home Center, Nolte, Veneta Cucine, checked out the neighborhood Modular Furniture & Kitchen Wala, spoken to the carpenter who did the house of so and so.......etc. etc........Means that you are now more confused than you were when you started off, well.... welcome to home making :).


In my earlier posts I have tried to help sort this very confusion offering inputs around
1. how to create a budget,
2. what to look for when you are making specialty artifacts like a sliding wardrobe & a modular kitchen.
3. good & reasonable places to shop for interiors in Bangalore.

Last week while answering a number of customer queries I realized that I have yet failed to answer one of the fundamental questions that home makers have i.e. with all the choice available in the market, what is the right material to use for one's woodwork?


So this post is dedicated to answer just that ... lets start with the Kitchen:

Carcass or the boxes:
If you are someone who does not plan a 3 year "refresh" of your kitchen then the only choice for the Kitchen carcass is Warterproof Marine Ply (Technically called BWR 303 Grade Ply....ISI Marked preferred). Many not so scrupulous will talk about using "Water Resistant" Ply, Laminated Particle Board, Marine Ply in wet areas and Particle board in dry areas etc. etc. for the carcass but trust me anything other than Waterproof Marine Ply means that you giving birth to something that will not last beyond its 3rd birthday, it is another matter that from a price perspective using Waterproof Marine Ply will lead to approx. a 20-25 % increase in the overall cost of the kitchen.
 
The interesting thing to know however is that while the Waterproof Marine “Ply” will be "Waterproof",  the (white) “laminate” that you put on top of it will still come off if one continuously pours water on it.
The intelligent amongst you will then ask – "So if even Waterproof Marine Ply carcass will eventually spoil (laminate coming off) due to high moisture, why use it at all" ???

The answer is that (1) The weight of the entire kitchen – Hardware, Drawer Channels, Kitchenware, Wall units etc. rests on the Carcass (Both Bottom and Wall unit boxes) and the bolts & screws that hold all this together need a pretty strong “base” to dig into. (2) Waterproof Marine Ply (ignore the laminate) is simply the best “base” that is available in the market that stays good even in the worst of moisture conditions. (3) Using any other "base" is simply amounts to compromising the life of your Kitchen.


Shutters:

Frankly each of MDF + Membrane, Hardwood as well as Marine Ply/MDF + Laminate work well. You will ask “Why is Marine Ply + Laminate not better than MDF + Membrane here then”??...well remember we said that anything (even the laminate on the Marine Ply) will spoil in high moisture conditions, so the assumption is that we are not using the kitchen as a bathroom. Secondly....the shutters do not hold the entire Kitchen weight, only their own. Hence in normal Kitchen use conditions both MDF + Membrane & Marine Ply/MDF + Laminate work well, however particle board shutters are not recommended.

I personally prefer MDF Membrane or Hardwood shutters as these give a finish that is much more chic than laminate. I have also noticed that most carpenters do not recommend MDF membrane and go with Marine Ply + Laminate. As I said from a durability perspective both are fine, perhaps carpenters do not recommend MDF Membrane & cite durability issues because these require external procurement (compared to the comfort & ease of making onsite) and very precise measurement (in millimeters) that carpenters abhor.


Wardrobes & Hall Units/ Crockery Units/ TV Units, Sideboards etc:

The Carcass for the above can be made with any material as in most cases the carcass has wall support from 2 or more sides. Hence if budget is a constraint and there is good wall support then even pre - laminated Particle board works here.

The panels/ shutters however are key here and need specific attention
The recommended material to use for panel/shutters in Wardrobes & Hall Units depends entirely on the size of the panel /shutter that you are going in for. If it is 9 feet tall (all the way to the roof) or a 7 feet tall sliding shutter (which is usually broader than a standard hinged shutter) & needs to resist bending forces, then use Block Board ONLY (preferably a 19mm + a 6mm (or more) sheet stuck together).

For a 7 foot hinged panel/shutter either a 19mm Block Board/ Marine Ply with Veneer/ Laminate or MDF + Laminate (membrane not recommended) should work fine.

For less than 7 feet panel/ shutter anything will work.


That covers it I guess....will welcome any bouquets and brickbats


Happy Homemaking


NM

NOTE: As on today - Jan 18, 2014 there are some 301 Q&A related to Interior design & material choice etc in the comments section below. Most questions that come to your mind after reading this post are probably already in the Q&A, hence before you pop up a fresh question do consider going through the Comments section below. 
Also due to the large number of comments, all the comments do not load in a single page - you will need to click "loading..." or "load more" near the bottom of the page to see the comments on the next page


Saturday, August 14, 2010

Costing your Woodwork - Do It Yourself Tips

"So how much will it cost"??? -- Usually the first question that I get from prospects. While for exact costs you would need the detailed design & probably some professional help, doing a broad estimation is no rocket science & one can do this on her/ his own since woodwork consists of broadly 4-5 elements.

1. The Carcass: The box in other words
2. The Shutter: Called the "Palla" by our carpenter brethren
3. The Hardware: Self explanatory
4. Accessories: All the steel stuff that you will put inside the wardrobe/ box (Tie hangers etc.for wardrobe &  Bottle Pullout, Drip Tray Etc. for kitchen)
5. Labour

Now that we have the elements here are the broad costs of each. Keep in mind that what I am mentioning here are thumbrule values and market rates

1. Carcass (Factory Made White Colour): Costs anywhere between INR 350 psft (frontage*) for Particle Board (ok for Wardrobes but not recommended for Kitchen) to INR 800 (frontage*) for hi quality Marine Ply (recommended  for Kitchens). If you want to bring down this cost you can go for handmade carcass which should cost approx 25 - 30% less.

2. Shutters (Machine Made) : Cost from INR 175 for Laminate Marine Ply Shutters to INR 450 for Membrane MDF Shutters

Tip: The above means that the total "Wood" Component would cost from INR 525 psft to INR 1250 psft. Safe to broadly assume around 1000 in your thumb-rule calculations. Assume the same rate for Kitchen as well as Wardrobe

3. Hardware: 
Kitchens: If you are going in for a number of drawers then assume approx 3500 per drawer (Hettich or 304 Grade Steel baskets). To cut costs (e.g. if you are planning to rent the house) you can minimize on the number of drawers, however with this the utility of the kitchen would go down.
Apart from the drawer cost, it is safe to assume INR 15000 for the rest of  the hardware (hinges, channels etc. etc.)
Handles: These seem inconsequential but cost a bomb if you go in for the exquisite ones available in the market. For Kitchens factor approx 5000 - 8000 for Handles alone

Wardrobe: Dont need much hardware. Usually the cost can be managed under INR 5000 for a normal wordrobe & INR 12000 for a Sliding Wardrobe

4. Accessories: 
There is a lot of variety here. For e.g a Magic Corner can cost from anywhere between INR 15000 to INR 90000. Hence don't take a guess here, go to a hardware & accessory shop and check out the rates of what you need.

5. Labour
For a Factory made Carcass & Shutters the "assembly" cost can be assumed at INR 80 psft. For Hand Made Carcass & Factory Made Shutters assume approx 150 - 180 psft


For those of you who have ended up more confused than before after reading the above, here is the "thumbrule" calculation

For a Wardrobe of Height 7 Feet X Width 3 feet= 21 sqft

Cost of Carcass & Shutter = INR 1000 X 21 = 21000
Cost of Hardware (Non Sliding) = INR 5000
Labour Cost = INR 80 X 21 sqft = INR 1680

Bingo !!!  Broad Estimate = INR 27680

I will not do a sample for the Kitchen and would rather let you do it on your own and come back to me with your questions when stuck...heh heh ..After all I want to make this interactive..

Happy Estimating

NM

PS1: A simpler thumb-rule for estimating overall interior costs is available at http://www.homedesignbangalore.com/2013/11/home-interiors-thumbrules-for-costing.html

PS2: For the Critic in you...who would say that (1) I am oversimplifying (2) That my estimates are not correct and you can get it "cheaper" in the market (3) Too many things have been left un- answered & not considered, I would only want to say that my effort is only to set you thinking on how YOU can "go about" estimating to help set up a budget for your interiors. Of Course for the actual work I would want you to come back to me :) or to the larger "Brotherhood" (or should I say "sisterhood") of Interior Designers.